Version 0.90b was created primarily to fix two of the new items, the Battle Standards, to not drop on death. The new Warp Rift also had a rather obvious mismatch between its learn and normal tooltips.
v0.90b Changelog
Fixes:
-fixed Battle Standard (Red or Blue) to not drop on death
-fixed Warp Rift tooltip typo
Balancing:
-nerfed Helicopter agility growth (23 + 2.7/level to 21 + 2.5/level)
-decreased Spear Mastery damage bonus by 5 (25/45/65/85 to 20/40/60/80)
-increased Conjure Tome mana cost (150 to 200)
The v0.90 Changelog can be found here.
Monday, July 28, 2008
Sunday, July 27, 2008
v0.90 Changelog
Two more heroes were added in version 0.90: the Dreadlord and the Conjurer. The Dreadlord is a strength-based "dps-er," with increased attack speed and damage, along with accessory damage and heal abilties. The Conjurer uses Life Orbs, special orbs can be gathered through an innate ability, to cast his other spells, which have various purposes, including conjuring potions and tomes as well as causing powerful detonations.
The Nerubian Lord was revamped as well, his ult is now a Shadowsight ability, which can gain vision of a target enemy and cause the Nerubian Lord's next attack against that target to deal critical damage. Web now works on an aoe.
Several items were included in this update, including 1 new basic and 4 new recipe items. The Charm of Wealth can increase the income of the wearer (although it does not stack with multiple charms). The Mask of the Vampire includes a melee lifesteal aura, the Ice Claws allow the user to cast a Frost Nova, as well as granting other powerful effects. Two Battle Standards, one red and the other blue, add several auras and enhancements to further strengthen the users.
v0.90 Changelog
Gameplay:
-revamped Nerubian Lord - Web works differently, Subjugating Attack is now non-ult, new ability: Shadowsight (new ult), removed Cannibalize
-new Hero: Dreadlord (Demon)
-new hero: Conjurer (High Elf)
Fixes:
-fixed Royal Guard to be a strength hero
-fixed Spirit Ferry to say Channeling
Balancing:
-improved Lightning Fury damage (50/75/100/125 to 65/95/125/155 per bolt)
-improved Maelstrom aoe (300 to 350)
-changed Warp Rift to improve cooldown instead of duration per level (duration at 5 sec)
-changed Mechanical Frame's spell reduction to a movement bonus (6/12/18/24/30 ms)
Items:
-replaced Staff of Silence with Charm of Wealth, which provides a non-stacking bonus income
-added a new recipe item shop with 4 new items: Mask of the Vampire, Ice Claws, Battle Standard (Red), Battle Standard (Blue)
Others:
-changed Death Swarm icon and animation
Friday, July 25, 2008
v0.89 Hero Statistics
Ranks in these lists do not factor in items or abilities; however, stat bonuses are included at level 29 statistics. In case of tie, heroes in the tie will be ranked in no particular order. Thanks to KavuChameleon for providing the original spreadsheet!
Top Tens
Strength per Level
1. Sludge King (+4.0)
2. Doom Guard (+3.3)
3. Ogre Warlord (+3.2)
4. Pit Lord (+3.2)
5. Abomination (+3.1)
6. Bandit (+3.0)
7. Jungle Stalker (+3.0)
8. Grunt (+2.9)
9. Mountain Giant (+2.9)
10. Death Knight (+2.6)
Agility per Level
1. Warden (+3.2)
2. Spell Breaker (+2.9)
3. Naga Warrior (+2.9)
4. Gnoll Assassin (+2.9)
5. Burning Archer (+2.9)
6. Gargoyle (+2.8)
7. Raider (+2.8)
8. Zergling (+2.8)
9. Harpy Stormwitch (+2.8)
10. Dark Ranger (+2.7)
11. Helicopter (+2.7)
12. Illusionist (+2.7)
Intelligence per Level
1. Void Walker (+3.6)
2. Skeletal Mage (+3.5)
3. Archmage (+3.3)
4. Banshee (+3.2)
5. Faerie Dragon (+3.2)
6. Druid of the Talon (+3.2)
7. Storm Panda (+3.0)
8. Tree Goddess (+3.0)
9. Tuskarr Mage (+2.9)
10. Satyr Thundercaller (+2.9)
11. Medicine Man (+2.9)
Total Stats per Level
1. Faerie Dragon (+6.7)
2. Archmage (+6.6)
3. Spell Breaker (+6.5)
4. Void Walker (+6.5)
5. Doom Guard (+6.4)
6. Demolitionist (+6.3)
7. Far Seer (+6.3)
8. Warden (+6.3)
9. Druid of the Talon (+6.3)
10. Chaos Peon (+6.3)
Level 29 Damage *(not including dice)
1. Sludge King (178)
2. Void Walker (169)
3. Skeletal Mage (161)
4. Archmage (156)
5. Faerie Dragon (155)
6. Ogre Warlord (154)
7. Doom Guard (154)
8. Banshee (154)
9. Pit Lord (153)
10. Druid of the Talon (153)
11. Abomination (153)
Level 29 Attack Speed *(cooldown in seconds)
1. Warden (0.74)
2. Naga Warrior (0.75)
3. Zergling (0.76)
4. Gnoll Assassin (0.76)
5. Burning Archer (0.76)
6. Gargoyle (0.77)
7. Spell Breaker (0.77)
8. Harpy Stormwitch (0.77)
9. Raider (0.77)
10. Dark Ranger (0.78)
11. Helicopter (0.78)
12. Mutation (0.78)
Level 29 DPS *(Damage per second)
1. Warden (205.18)
2. Naga Warrior (194.09)
3. Zergling (189.74)
4. Spell Breaker (185.44)
5. Raider (181.18)
6. Mutation (176.96)
7. Gnoll Assassin (174.46)
8. Burning Archer (174.46)
9. Illusionist (172.80)
10. Gargoyle (172.38)
Level 29 HP
1. Sludge King (3468)
2. Ogre Warlord (2964)
3. Doom Guard (2964)
4. Pit Lord (2943)
5. Abomination (2943)
6. Jungle Stalker (2769)
7. Bandit (2775)
8. Mountain Giant (2754)
9. Grunt (2733)
10. Death Knight (2565)
Level 29 Armor
1. Warden (14.1)
2. Naga Warrior (13.6)
3. Zergling (13.4)
4. Spell Breaker (13.2)
5. Raider (13.0)
6. Knight (13.0)
7. Mutation (12.8)
8. Illusionist (12.6)
9. Hippogryph (12.0)
10. Earth Revenant (12.0)
11. Desert Advocate (12.0)
12. Blood Fiend (12.0)
Level 29 EHP (Effective Hit Points, includes armor)
1. Ogre Warlord (4725)
2. Abomination (4709)
3. Sludge King (4654)
4. Jungle Stalker (4574)
5. Pit Lord (4568)
6. Doom Guard (4529)
7. Grunt (4520)
8. Mountain Giant (4473)
9. Bandit (4424)
10. Footman (4213)
Level 29 Mana
1. Void Walker (2086)
2. Skeletal Mage (1974)
3. Archmage (1904)
4. Faerie Dragon (1890)
5. Banshee (1876)
6. Druid of the Talon (1862)
7. Storm Panda (1806)
8. Tree Goddess (1778)
9. Satyr Thundercaller (1750)
10. Medicine Man (1750)
Level 29 Movespeed
1. Warden (346.2)
2. Crypt Lurker (345.8)
3. Spell Breaker (344.4)
4. Dark Ranger (343.8)
5. Illusionist (343.2)
6. Knight (342.0)
7. Hippogryph (342.0)
8. Huntress (341.6)
9. Kobold Digger (340.4)
10. Dragonhawk Rider (338.0)
Level 29 Battle Power (DPS times EHP)
1. Raider (718,839)
2. Warden (693,143)
3. Ogre Warlord (685,467)
4. Spell Breaker (684,870)
5. Sludge King (684,538)
6. Abomination (682,528)
7. Naga Warrior (667,235)
8. Mutation (664,544)
9. Jungle Stalker (653,782)
10. Grunt (643,012)
Bottom Tens
Strength per Level
1. Tree Goddess (+1.2)
2. Skeletal Mage (+1.3)
3. Skinkapulter (+1.4)
4. Rifleman (+1.4)
5. Gnoll Assassin (+1.4)
6. Huntress (+1.4)
7. Zergling (+1.5)
8. Harpy Stormwitch (+1.5)
9. Helicopter (+1.5)
10. Merchant (+1.5)
11. Tuskarr Mage (+1.5)
12. Troll Beserker (+1.5)
13. Warden (+1.5)
14. Elven Hunter (+1.5)
15. Flame Contraption (+1.5)
16. Banshee (+1.5)
Agility per Level
1. Sludge King (+1.0)
2. Storm Panda (+1.0)
3. Banshee (+1.3)
4. Satyr Thundercaller (+1.3)
5. Skeletal Mage (+1.3)
6. Void Walker (+1.3)
7. Shadow Lich (+1.3)
8. Doom Guard (+1.3)
9. Tree Goddess (+1.3)
10. Paladin (+1.3)
11. Pit Lord (+1.3)
Intelligence per Level
1. Sludge King (+1.0)
2. Raider (+1.1)
3. Dryad (+1.2)
4. Grunt (+1.2)
5. Footman (+1.2)
6. Hippogryph (+1.2)
7. Gnoll Assassin (+1.2)
8. Naga Warrior (+1.2)
9. Ogre Warlord (+1.2)
10. Troll Beserker (+1.3)
11. Abomination (+1.3)
12. Rifleman (+1.3)
13. Jungle Stalker (+1.3)
14. Blood Fiend (+1.3)
Total Stats per Level
1. Rifleman (+4.9)
2. Hippogryph (+5.2)
3. Troll Beserker (+5.3)
4. Master of the Hunt (+5.3)
5. Nerubian Lord (+5.5)
6. War Golem (+5.5)
7. Shaman (+5.5)
8. Gnoll Assassin (+5.5)
9. Shaman (+5.5)
10. Dryad (+5.5)
11. Troll Batrider (+5.5)
Level 29 Damage *(not including dice)
1. Merchant (107)
2. Nether Dragon (109)
3. Ghost (111)
4. Druid of the Claw (111)
5. Meat Wagon (111)
6. Rifleman (114)
7. Crypt Lurker (114)
8. Eredar Diabolist (114)
9. Nerubian Lord (114)
10. Shaman (117)
11. Knight (117)
Level 29 Attack Speed *(cooldown in seconds)
1. Sludge King (1.21)
2. Storm Panda (1.17)
3. Paladin (1.14)
4. Doom Guard (1.13)
5. Tree Goddess (1.13)
6. Shadow Lich (1.13)
7. Satyr Thundercaller (1.12)
8. Void Walker (1.12)
9. Banshee (1.12)
10. Skeletal Mage (1.10)
11. Pit Lord (1.10)
12. Sorceress (1.10)
Level 29 DPS
1. Druid of the Claw (113.34)
2. Paladin (113.58)
3. Demolitionist (113.79)
4. Warlock (113.99)
5. Shaman (115.15)
6. War Golem (115.52)
7. Alchemist (115.88)
8. Eredar Diabolist (116.40)
9. Polar Furbolg Shaman (116.54)
10. Spirit Walker (116.54)
Level 29 HP
1. Tree Goddess (1578)
2. Skeletal Mage (1620)
3. Skinkapulter (1683)
4. Huntress (1704)
5. Elven Hunter (1746)
6. Troll Beserker (1746)
7. Rifleman (1746)
8. Zergling (1746)
9. Gnoll Assassin (1767)
10. Flame Contraption (1767)
11. Harpy Stormwitch (1767)
12. Merchant (1767)
13. Helicopter (1767)
Level 29 Armor
1. Storm Panda (4.3)
2. Skeletal Mage (5.2)
3. Druid of the Talon (5.4)
4. Hematologist (5.7)
5. Sludge King (5.7)
6. Shadow Lich (5.8)
7. Tree Goddess (5.8)
8. Warlock (5.9)
9. Arcane Wizard (5.9)
10. Void Walker (5.9)
11. Satyr Thundercaller (5.9)
Level 29 EHP
1. Skeletal Mage (2125)
2. Tree Goddess (2127)
3. Flame Contraption (2403)
4. Banshee (2432)
5. Void Walker (2449)
6. Tuskarr Mage (2453)
7. Druid of the Talon (2506)
8. Shaman (2507)
9. Holy Priest (2515)
10. Sorceress (2522)
Level 29 Mana
1. Raider (868)
2. Footman (910)
3. Hippogryph (924)
4. Naga Warrior (924)
5. Dryad (938)
6. Gnoll Assassin (952)
7. Ogre Warlord (952)
8. Sludge King (952)
9. Abomination (952)
10. Jungle Stalker (952)
Level 29 Movespeed
1. War Golem (287.2)
2. Centaur Khan (291.0)
3. Pit Lord (294.4)
4. Warlock (295.8)
5. Rifleman (296.4)
6. Makrura (297.4)
7. Grunt (297.8)
8. Paladin (298.2)
9. Kodo Rider (299.8)
10. Alchemist (300.8)
Level 29 Battle Power
1. Tree Goddess (276,484)
2. Shaman (288,662)
3. Shadow Lich (300,087)
4. Ice Troll Priest (304,503)
5. Flame Contraption (305,070)
6. Holy Priest (308,027)
7. Skeletal Mage (309,777)
8. Sorceress (316,863)
9. Storm Panda (331,420)
10. Destroyer (331,581)
Wednesday, July 23, 2008
v0.89 Changelog
Version 0.89 includes the introduction of 2 new heroes, which brings the total count up to 100! One of the new heroes is the (Naga) Royal Guard, a strength-based hybrid that can fight efficiently and cast powerful water spells. The Spirit of Vengeance is an intelligence-based assassin that can instantly but temporarily traverse the map and stay in areas long enough to provide killing blows. Both of the new heroes are spell-heavy, with no passives.
In addition, the Death Ranger is completely remade, now known as the Burning Archer. Its old skills are no more, although Strafe retains the original name. Strafe now deals its damage near instantaneously, as opposed to a launching timed barrage of arrows. It also gained the Burning Arrows ability, allowing it to fire special arrows that deal extra damage and cause Burn damage over time. Instead of utilizing a Decoy, the Burning Archer can increase its damage directly with Blazing Agility, improving its base agility by a percentage temporarily. Finally, it now has the power to launch an Exploding Arrow, which travels in a line until it hits an enemy, whereupon the arrow explodes and deals massive area of effect damage. Like the new heroes introduced in this version, the Burning Archer also has no passives, and thus must make wide use its abilities.
v0.89 included the usual balancing and bug fixing, though no hero was changed drastically, except of course Burning Archer. The Merchant suffered a severe damage limitation in its Gold Stash ability, which used to cause way too much damage. Also, Shadow Lich's Wisdom of the Dead ability is now able to hit a given target only once per second, thus reducing its old damage output immensely in certain scenarios.
Concerning items, a slight change was made to the stat bonus from hero kills on the Glass of Beer. The stacking used to encourage players to have multiple Glasses, as the high stat bonuses would provide a feedback loop, making it easier to kill the next hero, etc. This effect is now unable to stack with multiple Glasses, although the regeneration, armor, and normal stat bonuses still stack.
Finally, some heroes underwent a few aesthetic changes, with a few new icons as well as attack and spell animations. The Death Ranger's old model changed into a flaming one, thus allowing it to become the Burning Archer.
.89 Changelog
Gameplay:
-remade Death Ranger into Burning Archer, with 4 new abilities
-new hero: Royal Guard (High Elf)
-new hero: Spirit of Vengeance (Demon)
Fixes:
-fixed top lanes to not spawn bonus creeps in the first wave
-fixed Poison Arrows to be unable to target allied units
-fixed a stun glitch with Crippling Void and Voodoo Curse
-fixed Bloodfiend's hotkey overlap from new ability last version
-fixed Mana Freeze tooltip typo
Balancing:
-Druid of the Claw: agility - 1.8/level to 2.1/level
-Helicopter: base movespeed - 325 to 310
-Illusionist: strength - 2.2/level to 1.9/level, agility - 2.4/level to 2.7/level
--Pandemonium: mana cost - 150/120/90/60/30 to 100
--Image Slash: slash damage - 30/60/90/120/150 to 40/80/120/160/200, mana cost - 60 to 100
-Jungle Stalker
--Beserk: agility gained when taking damage - 3 to 5
-Merchant
--Gold Stash: damage cap - 40/80/120/160/200 to 25/50/75/100/125, cooldown - 8/6/4/2/0 to 0/0/0/0/0
--Alchemy: cooldown - 150/120/90/60/45 to 45/45/45/45/45, mana cost - 140 to 150/120/90/60/30
-Mutation
--Kyriaki: cooldown - 140 to 120
-Necromancer: intelligence - 2.2/level to 2.6/level
-Obsidian Statue: strength - 2.2/level to 1.9/level, agility - 1.6/level to 1.9/level
-Shadow Lich
--Wisdom of the Dead: limited hits on one target to once per second
-Shadow Priest
--Unholy Conversion: max level limit for creeps - 5 to 6
-Spider: agility - 2.3/level to 2.4/level
-Void Walker
--Anti-magic Shell: shield life - 100/175/250/325/400 to 125/250/375/500/625
Items:
-Glass of Beer now does not stack in stat bonuses from hero kills
Others:
-added new model for Death Ranger, who is now Burning Archer
-added new icons for Death Swarm, Impaling Spear, Lethal Injection, Lift Off, Pick Toss, Overrun, Toxic Stew
-added new attack missiles for Arcane Wizard, Flame Contraption, Meat Wagon, Spirit Walker
-added new animations for Arcane Channeling, Lethal Injection
Tuesday, July 15, 2008
A Beginner's Guide to SMotA
This is a beginner's guide to SMotA and is written for those who have just started the game or want some tips for improvement.
Contents
I. AoS Gameplay
I. AoS Gameplay
SMotA is an Aeon of Strife (AoS) type map, where each player controls a hero that can grow stronger over time. A familiar map that is also an AoS would be DotA. AoS originally came from StarCraft; however, the WarCraft III map editor is simply much stronger, allowing for functions impossible to make with the StarCraft editor.
1. Objective
Destroy the enemy base structure.
The High Elves must raze the Demonic Portal, whereas the Demons must eradicate the Well of Eternity. Both of these structures have an extremely high amount of hitpoints and armor, and also quite a bit of regeneration. The easiest way to bring these down is to first destroy the barrack structures, allowing upgraded creeps and even Mega Creeps, the strongest level of spawned creeps. Mega Creeps can kill the otherwise invincible fortresses in a matter of seconds. These are much stronger than their counterparts in DotA.
2. Heroes
To help reach the objective, each player picks a hero from one of the taverns in the beginning of the game. They can also use the -random command, giving them a random hero. If the decision is made within the first two minutes, a player can type -repick, relinquishing their current hero and allowing him to repick another.
Each hero has a primary attribute: strength, agility, or intelligence. Strength heroes tend to have more hitpoints and be difficult to kill, agility heroes are generally faster and can deal more damage, while intelligence heroes normally have a wide range of spells available to help with many aspects of the game. For a more detailed explanation of these, take a look at the Attributes article.
3. Items
In SMotA, many items can "upgrade" or combine with other items into more powerful versions.
In the early game, it is important to have a source of hitpoint and/or mana regeneration and also bonus stats. It is not a surpise then that one of the most popular starting items for advanced players is the Keg of Ale, which provides hitpoint and mana regeneration, armor, and a bonus to all stats. It is created from 4 items that each provide one of the bonuses of the original item: Ring of Regeneration, Sobi Mask, Ring of Protection, and Circlet of Nobility.
Another important aspect throughout the game is movement speed, which is given by the Boot/Gauntlet tree. A simple level 1 Boots of Speed is sufficient in the early game, but a level 3 Boots of Speed can later combine with a level 3 Gloves of Haste, resulting in a level 1 Power Gauntlets, which in turn can also be upgraded to level 3, providing a whopping 110 movespeed. There are many more items for the beginner to explore, and it must be mentioned that a secret shop exists, despite the fact that it doesn't sell anything.
4. Lanes
A lane is a path that is taken by spawned creeps from its own base to the enemy's. There are three lanes, which are commonly referred to as top, middle, and bottom. The top and bottom lanes each possess an Outpost, while the middle lane contains two. Observatories also exist between the middle lane and either side lane.
5. Bases
Each team begins with one relatively large base. Players are normally safe once inside their bases, that is, unless oppoenents have taken down base towers and such. Bases contain shops that sell important items. The High Elves begin with a base on the Southwest, while the Demonic base resides in the Northeast.
6. Outposts
Outposts are mini-bases that are located near the center or at the other two corners from the main bases. The top lane outpost is initially controlled by the High Elves and is located in the Northwest, whereas the bottom lane outpost is controlled by the Demons in the Southeast. Additionally, two Outposts are located in the middle lane, each team controlling the closer one in the beginning. Outposts spawn special creeps, provide sight, and come with teleporters back to base. Outposts can be captured by either team. If a team can hold all four Outposts for an extended period of time, they are normally at an advantage.
7. Observatories
Observatories, like Outposts, can be traded back and forth between the two teams. Observatories do not offer as many benefits such as extra creep spawning and teleporters, but they provide an enormous area of sight, hence their name. See the article on Observatories for more information.
8. Creeps
Creeps are spawned primarily from the two main bases, however, the Outposts will spawn bonus creeps once in a while. Outpost creeps are stronger than normal ones, but are small in number. Main bases also periodically spawn bonus creeps themselves, including magical and flying ones in addition to the normal melee and ranged creeps. Neutral creeps exist at several sites across the map; these fight for neither side and are hostile to anyone who crosses their path. However, they often give more bounty than lane creeps, and tougher ones can give more experience as well.
9. Pushing
Pushing is simply the act of advancing along one or more lanes; this normally involves destroying towers. On the map it looks like one team is pushing the other one back, hence the name. A win is impossible without pushing, because a player must advance into the enemy base to achieve victory.
II. Hero Classifications
Note: one hero can fit into more than one classification.
1. Assassin
Assassins specialize in quickly killing other heroes, especially ones with low hitpoints. Assassins are generally agility heroes and many have ambushing abilities like some form of invisiblity or quick movement. Many assassins also have skills that improve their damage output.
Subcategories:
These heroes nuke or use spells to deal massive damage as opposed to using physical attacks. Almost all nukers are intelligence heroes.
Examples:
These are heroes who excel in destroying large waves, or groups, of enemy creeps and can also empower allied ones. And as the name suggests, these heroes are also able to advance quickly along a selected lane; any abilities that help kill towers help as well. A successful pusher can often win the game for their team if they succeed in infiltration of the enemy base.
Subcategories:
These heroes will help their allies and hurt their enemies with support skills, not necessarily dealing damage. This is perhaps the widest category of heroes.
Subcategories:
These are heroes who can tank, or withstand a lot of damage, usually with high hitpoints, armor, or healing. Tanks are used to draw enemy fire away from more fragile targets like assassins or nukers. They are also used to lead pushes. Most tanks are strength heroes.
Examples:
1. Try to avoid dying. And by that I mean be alert, look around often for enemy heroes, etc. It is normally more important to keep yourself alive than to kill an enemy.
2. Look through the heroes on single player. SMotA allows unlimited repicking in single player, so it is possible to go through many heroes in a single session. Generally beginners find agility-based ranged heroes easiest to play.
3. Look through the items on single player as well. Knowing the types of items can help with various aspects of the game.
4. Don't try to fight someone several levels above you, unless they are on low hitpoints and you know you can kill them.
5. Know when to retreat. If you are chasing a nearly dead enemy and they reach their base or another hero, it is normally time to give up the chase and return home.
6. Level really matters!
7. Try not to let creeps attack you in the early game. If you follow this, you will almost always have more hitpoints.
8. Do not fight when outnumbered. I had a game where an ally and I were pushing a lane with about 10 creeps, and suddenly an enemy popped up to face us both with the creeps. He ran into the midst of the creeps and we killed him in about 5 seconds. Which brings us to:
9. Do not underestimate creeps. You can face them in the late game, but trying to solo a creep wave is suicidal early on.
10. Keep your health up. If you are running low on health, go back to base as quickly as possible (i.e. via Teleporters), heal, and get back in the lane. Many beginners die because they think they are safe even when they have only a small amount of hitpoints left. Generally, if you are ever at less than 33% health, a fountain heal is recommended.
11. Keep your team in mind. If an ally deserves a kill, don't steal it. If you have a healing spell, heal your allies when they are low on health. Use beneficial spells on them, etc.
12. Know that spells deal 75% damage to heroes. Suppose you want to finish someone off with a 400 damage spell, and you are attacking the enemy. Wait for his hp to go below 300, then cast the spell; this will kill him. If you cast the spell first, they will immediately run and depending on the situation, it may or may not be possible to chase them.
13. To get gold for killing a creep, you must provide the final hit. In other words, if you took down a creep from 500 to 10 health and a nearby allied creep with more than 10 damage hits it, you will not get any gold. A good player will turn that around, letting allied creeps do the damaging and then time a last hit to get the gold. You get experience either way.
14. You can deny an allied creep, causing it to not give gold or experience to your opponents. This is done by attacking and killing one of your allied creeps when they are at low health.
15. Get a Keg of Ale in the early game. It will help you survive immensely.
Contents
I. AoS Gameplay
- Objective
- Heroes
- Items
- Lanes
- Bases
- Outposts
- Observatories
- Creeps
- Pushing
- Assassin
- Nuker
- Pusher
- Support
- Tank
I. AoS Gameplay
SMotA is an Aeon of Strife (AoS) type map, where each player controls a hero that can grow stronger over time. A familiar map that is also an AoS would be DotA. AoS originally came from StarCraft; however, the WarCraft III map editor is simply much stronger, allowing for functions impossible to make with the StarCraft editor.
1. Objective
Destroy the enemy base structure.
The High Elves must raze the Demonic Portal, whereas the Demons must eradicate the Well of Eternity. Both of these structures have an extremely high amount of hitpoints and armor, and also quite a bit of regeneration. The easiest way to bring these down is to first destroy the barrack structures, allowing upgraded creeps and even Mega Creeps, the strongest level of spawned creeps. Mega Creeps can kill the otherwise invincible fortresses in a matter of seconds. These are much stronger than their counterparts in DotA.
2. Heroes
To help reach the objective, each player picks a hero from one of the taverns in the beginning of the game. They can also use the -random command, giving them a random hero. If the decision is made within the first two minutes, a player can type -repick, relinquishing their current hero and allowing him to repick another.
Each hero has a primary attribute: strength, agility, or intelligence. Strength heroes tend to have more hitpoints and be difficult to kill, agility heroes are generally faster and can deal more damage, while intelligence heroes normally have a wide range of spells available to help with many aspects of the game. For a more detailed explanation of these, take a look at the Attributes article.
3. Items
In SMotA, many items can "upgrade" or combine with other items into more powerful versions.
In the early game, it is important to have a source of hitpoint and/or mana regeneration and also bonus stats. It is not a surpise then that one of the most popular starting items for advanced players is the Keg of Ale, which provides hitpoint and mana regeneration, armor, and a bonus to all stats. It is created from 4 items that each provide one of the bonuses of the original item: Ring of Regeneration, Sobi Mask, Ring of Protection, and Circlet of Nobility.
Another important aspect throughout the game is movement speed, which is given by the Boot/Gauntlet tree. A simple level 1 Boots of Speed is sufficient in the early game, but a level 3 Boots of Speed can later combine with a level 3 Gloves of Haste, resulting in a level 1 Power Gauntlets, which in turn can also be upgraded to level 3, providing a whopping 110 movespeed. There are many more items for the beginner to explore, and it must be mentioned that a secret shop exists, despite the fact that it doesn't sell anything.
4. Lanes
A lane is a path that is taken by spawned creeps from its own base to the enemy's. There are three lanes, which are commonly referred to as top, middle, and bottom. The top and bottom lanes each possess an Outpost, while the middle lane contains two. Observatories also exist between the middle lane and either side lane.
5. Bases
Each team begins with one relatively large base. Players are normally safe once inside their bases, that is, unless oppoenents have taken down base towers and such. Bases contain shops that sell important items. The High Elves begin with a base on the Southwest, while the Demonic base resides in the Northeast.
6. Outposts
Outposts are mini-bases that are located near the center or at the other two corners from the main bases. The top lane outpost is initially controlled by the High Elves and is located in the Northwest, whereas the bottom lane outpost is controlled by the Demons in the Southeast. Additionally, two Outposts are located in the middle lane, each team controlling the closer one in the beginning. Outposts spawn special creeps, provide sight, and come with teleporters back to base. Outposts can be captured by either team. If a team can hold all four Outposts for an extended period of time, they are normally at an advantage.
7. Observatories
Observatories, like Outposts, can be traded back and forth between the two teams. Observatories do not offer as many benefits such as extra creep spawning and teleporters, but they provide an enormous area of sight, hence their name. See the article on Observatories for more information.
8. Creeps
Creeps are spawned primarily from the two main bases, however, the Outposts will spawn bonus creeps once in a while. Outpost creeps are stronger than normal ones, but are small in number. Main bases also periodically spawn bonus creeps themselves, including magical and flying ones in addition to the normal melee and ranged creeps. Neutral creeps exist at several sites across the map; these fight for neither side and are hostile to anyone who crosses their path. However, they often give more bounty than lane creeps, and tougher ones can give more experience as well.
9. Pushing
Pushing is simply the act of advancing along one or more lanes; this normally involves destroying towers. On the map it looks like one team is pushing the other one back, hence the name. A win is impossible without pushing, because a player must advance into the enemy base to achieve victory.
II. Hero Classifications
Note: one hero can fit into more than one classification.
1. Assassin
Assassins specialize in quickly killing other heroes, especially ones with low hitpoints. Assassins are generally agility heroes and many have ambushing abilities like some form of invisiblity or quick movement. Many assassins also have skills that improve their damage output.
Subcategories:
- Invisibility Heroes: can become invisible in some way, useful for ambushing and escaping; check out the Invisibility article for a comprehensive list of these heroes
- Chasers: can move at very high speeds and outrun fleeing heroes, or can slow down or even stop enemies with spells and bashes
- DPS'ers: have high damage per second (dps)
- Elven Hunter: can become passively invisible with Hunter's Cunning and can slow enemies down with Poison Arrows and Speed Drain, of which the latter speeds up the Elven Hunter as well
- Raider: can move quickly with Accelerating Warp and Blazing Speed and deal massive damage with Blood Pact, also can slow down enemies with Gushing Blade
- Troll Beserker: can increase attack speed with Beserk and damage with Spear Mastery
These heroes nuke or use spells to deal massive damage as opposed to using physical attacks. Almost all nukers are intelligence heroes.
Examples:
- Tuskarr Mage: can deal spell damage with Frost Bolt, Snowball, Winter Chill, and Nova of Frost
- Warlock: can deal spell damage with Immolate, Incinerate, Shadowfury, and Conflagrate :D
These are heroes who excel in destroying large waves, or groups, of enemy creeps and can also empower allied ones. And as the name suggests, these heroes are also able to advance quickly along a selected lane; any abilities that help kill towers help as well. A successful pusher can often win the game for their team if they succeed in infiltration of the enemy base.
Subcategories:
- AoE (Area of Effect) Heroes: can deal damage to multiple targets at a time, facilitating annihilation of creep waves, includes both AoE physical and magical damage
- Summoners: can summon their own special creeps to attack enemies
- Tower Killers: can kill towers more easily than most heroes
- Mountain Giant: can hit multiple creeps in one attack with Mighty Attack
- Skeletal Mage: can summon Zombies and cause AoE damage with Soul Barrage and Crippling Void
- Goblin Sapper: can raze enemy structures with Demolition Bot and Land Mine
These heroes will help their allies and hurt their enemies with support skills, not necessarily dealing damage. This is perhaps the widest category of heroes.
Subcategories:
- Healer: can heal allied heroes
- Enchanter: can place powerful buffs on allied heroes, including auras
- Disabler: can cast spells that reduce or neutralize enemies' combat abilities, including damage output, defense, movement, and spell-casting
- Stunner: can stun enemy heroes, stopping them and rendering them unable to attack or cast spells shortly
- Holy Priest: can heal allies with Touch of God and Global Heal, and can provide two buffs with Brilliance Aura and Divine Intervention
- Paladin: can heal allies and remove harmful spell effects with Purify and can siginificantly improve their defense with Divine Empowerment
- Tree Goddess: can Rock Hex enemies and also immobilize them with Grasp of Nature
- Tauren: can stun enemies with Split Earth and Global Stomp
These are heroes who can tank, or withstand a lot of damage, usually with high hitpoints, armor, or healing. Tanks are used to draw enemy fire away from more fragile targets like assassins or nukers. They are also used to lead pushes. Most tanks are strength heroes.
Examples:
- War Golem: can heal with Reassemble and can improve hitpoints and armor with Nanoplating
- Sludge King: can have an enormous quantity of hitpoints and armor with Sludge Composition
1. Try to avoid dying. And by that I mean be alert, look around often for enemy heroes, etc. It is normally more important to keep yourself alive than to kill an enemy.
2. Look through the heroes on single player. SMotA allows unlimited repicking in single player, so it is possible to go through many heroes in a single session. Generally beginners find agility-based ranged heroes easiest to play.
3. Look through the items on single player as well. Knowing the types of items can help with various aspects of the game.
4. Don't try to fight someone several levels above you, unless they are on low hitpoints and you know you can kill them.
5. Know when to retreat. If you are chasing a nearly dead enemy and they reach their base or another hero, it is normally time to give up the chase and return home.
6. Level really matters!
7. Try not to let creeps attack you in the early game. If you follow this, you will almost always have more hitpoints.
8. Do not fight when outnumbered. I had a game where an ally and I were pushing a lane with about 10 creeps, and suddenly an enemy popped up to face us both with the creeps. He ran into the midst of the creeps and we killed him in about 5 seconds. Which brings us to:
9. Do not underestimate creeps. You can face them in the late game, but trying to solo a creep wave is suicidal early on.
10. Keep your health up. If you are running low on health, go back to base as quickly as possible (i.e. via Teleporters), heal, and get back in the lane. Many beginners die because they think they are safe even when they have only a small amount of hitpoints left. Generally, if you are ever at less than 33% health, a fountain heal is recommended.
11. Keep your team in mind. If an ally deserves a kill, don't steal it. If you have a healing spell, heal your allies when they are low on health. Use beneficial spells on them, etc.
12. Know that spells deal 75% damage to heroes. Suppose you want to finish someone off with a 400 damage spell, and you are attacking the enemy. Wait for his hp to go below 300, then cast the spell; this will kill him. If you cast the spell first, they will immediately run and depending on the situation, it may or may not be possible to chase them.
13. To get gold for killing a creep, you must provide the final hit. In other words, if you took down a creep from 500 to 10 health and a nearby allied creep with more than 10 damage hits it, you will not get any gold. A good player will turn that around, letting allied creeps do the damaging and then time a last hit to get the gold. You get experience either way.
14. You can deny an allied creep, causing it to not give gold or experience to your opponents. This is done by attacking and killing one of your allied creeps when they are at low health.
15. Get a Keg of Ale in the early game. It will help you survive immensely.
Monday, July 14, 2008
v0.88 Hero Statistics
Ranks in these lists do not factor in items or abilities; however, stat bonuses are included at level 29 statistics. In case of tie, heroes in the tie will be ranked in no particular order. Thanks to KavuChameleon for providing the original spreadsheet!
Top Tens
Strength per Level
1. Sludge King (+4.0)
2. Doom Guard (+3.3)
3. Ogre Warlord (+3.2)
4. Pit Lord (+3.2)
5. Abomination (+3.1)
6. Bandit (+3.0)
7. Jungle Stalker (+3.0)
8. Grunt (+2.9)
9. Mountain Giant (+2.9)
10. Death Knight (+2.6)
Agility per Level
1. Warden (+3.2)
2. Spell Breaker (+2.9)
3. Naga Warrior (+2.9)
4. Gnoll Assassin (+2.9)
5. Gargoyle (+2.8)
6. Raider (+2.8)
7. Zergling (+2.8)
8. Harpy Stormwitch (+2.8)
9. Dark Ranger (+2.7)
10. Helicopter (+2.7)
Intelligence per Level
1. Void Walker (+3.6)
2. Skeletal Mage (+3.5)
3. Archmage (+3.3)
4. Banshee (+3.2)
5. Faerie Dragon (+3.2)
6. Druid of the Talon (+3.2)
7. Storm Panda (+3.0)
8. Tree Goddess (+3.0)
9. Tuskarr Mage (+2.9)
10. Satyr Thundercaller (+2.9)
11. Medicine Man (+2.9)
Total Stats per Level
1. Faerie Dragon (+6.7)
2. Archmage (+6.6)
3. Spell Breaker (+6.5)
4. Void Walker (+6.5)
5. Doom Guard (+6.4)
6. Demolitionist (+6.3)
7. Far Seer (+6.3)
8. Warden (+6.3)
9. Druid of the Talon (+6.3)
10. Chaos Peon (+6.3)
Level 29 Damage *(not including dice)
1. Sludge King (178)
2. Void Walker (169)
3. Skeletal Mage (161)
4. Archmage (156)
5. Faerie Dragon (155)
6. Ogre Warlord (154)
7. Doom Guard (154)
8. Banshee (154)
9. Pit Lord (153)
10. Druid of the Talon (153)
11. Abomination (153)
Level 29 Attack Speed *(cooldown in seconds)
1. Warden (0.74)
2. Naga Warrior (0.75)
3. Zergling (0.76)
4. Gnoll Assassin (0.76)
5. Gargoyle (0.77)
6. Spell Breaker (0.77)
7. Harpy Stormwitch (0.77)
8. Raider (0.77)
9. Dark Ranger (0.78)
10. Helicopter (0.78)
11. Mutation (0.78)
Level 29 DPS *(Damage per second)
1. Warden (205.18)
2. Naga Warrior (194.09)
3. Zergling (189.74)
4. Spell Breaker (185.44)
5. Raider (181.18)
6. Mutation (176.96)
7. Gnoll Assassin (174.46)
8. Gargoyle (172.38)
9. Harpy Stormwitch (168.24)
10. Dark Ranger (166.18)
Level 29 HP
1. Sludge King (3468)
2. Ogre Warlord (2964)
3. Doom Guard (2964)
4. Pit Lord (2943)
5. Abomination (2943)
6. Jungle Stalker (2769)
7. Bandit (2775)
8. Mountain Giant (2754)
9. Grunt (2733)
10. Death Knight (2565)
Level 29 Armor
1. Warden (14.1)
2. Naga Warrior (13.6)
3. Zergling (13.4)
4. Spell Breaker (13.2)
5. Raider (13.0)
6. Knight (13.0)
7. Mutation (12.8)
8. Hippogryph (12.0)
9. Earth Revenant (12.0)
10. Desert Advocate (12.0)
11. Blood Fiend (12.0)
Level 29 EHP (Effective Hit Points, includes armor)
1. Ogre Warlord (4725)
2. Abomination (4709)
3. Sludge King (4654)
4. Jungle Stalker (4574)
5. Pit Lord (4568)
6. Doom Guard (4529)
7. Grunt (4520)
8. Mountain Giant (4473)
9. Bandit (4424)
10. Footman (4213)
Level 29 Mana
1. Void Walker (2086)
2. Skeletal Mage (1974)
3. Archmage (1904)
4. Faerie Dragon (1890)
5. Banshee (1876)
6. Druid of the Talon (1862)
7. Storm Panda (1806)
8. Tree Goddess (1778)
9. Satyr Thundercaller (1750)
10. Medicine Man (1750)
Level 29 Movespeed
1. Helicopter (348.6)
2. Warden (346.2)
3. Crypt Lurker (345.8)
4. Spell Breaker (344.4)
5. Dark Ranger (343.8)
6. Knight (342.0)
7. Hippogryph (342.0)
8. Huntress (341.6)
9. Illusionist (341.6)
10. Kobold Digger (340.4)
Level 29 Battle Power (DPS times EHP)
1. Raider (718,839)
2. Warden (693,143)
3. Ogre Warlord (685,467)
4. Spell Breaker (684,870)
5. Sludge King (684,538)
6. Abomination (682,528)
7. Naga Warrior (667,235)
8. Mutation (664,544)
9. Jungle Stalker (653,782)
10. Grunt (643,012)
Bottom Tens
Strength per Level
1. Tree Goddess (+1.2)
2. Skeletal Mage (+1.3)
3. Skinkapulter (+1.4)
4. Rifleman (+1.4)
5. Gnoll Assassin (+1.4)
6. Huntress (+1.4)
7. Zergling (+1.5)
8. Harpy Stormwitch (+1.5)
9. Helicopter (+1.5)
10. Merchant (+1.5)
11. Tuskarr Mage (+1.5)
12. Troll Beserker (+1.5)
13. Warden (+1.5)
14. Elven Hunter (+1.5)
15. Flame Contraption (+1.5)
16. Banshee (+1.5)
Agility per Level
1. Sludge King (+1.0)
2. Storm Panda (+1.0)
3. Banshee (+1.3)
4. Satyr Thundercaller (+1.3)
5. Skeletal Mage (+1.3)
6. Void Walker (+1.3)
7. Shadow Lich (+1.3)
8. Doom Guard (+1.3)
9. Tree Goddess (+1.3)
10. Paladin (+1.3)
11. Pit Lord (+1.3)
Intelligence per Level
1. Sludge King (+1.0)
2. Raider (+1.1)
3. Dryad (+1.2)
4. Grunt (+1.2)
5. Footman (+1.2)
6. Hippogryph (+1.2)
7. Gnoll Assassin (+1.2)
8. Naga Warrior (+1.2)
9. Ogre Warlord (+1.2)
10. Troll Beserker (+1.3)
11. Abomination (+1.3)
12. Rifleman (+1.3)
13. Jungle Stalker (+1.3)
14. Blood Fiend (+1.3)
Total Stats per Level
1. Rifleman (+4.9)
2. Hippogryph (+5.2)
3. Troll Beserker (+5.3)
4. Master of the Hunt (+5.3)
5. Nerubian Lord (+5.5)
6. War Golem (+5.5)
7. Necromancer (+5.5)
8. Shaman (+5.5)
9. Druid of the Claw (+5.5)
10. Gnoll Assassin (+5.5)
11. Shaman (+5.5)
12. Dryad (+5.5)
13. Troll Batrider (+5.5)
Level 29 Damage *(not including dice)
1. Merchant (107)
2. Nether Dragon (109)
3. Ghost (111)
4. Druid of the Claw (111)
5. Meat Wagon (111)
6. Rifleman (114)
7. Crypt Lurker (114)
8. Eredar Diabolist (114)
9. Nerubian Lord (114)
10. Shaman (117)
11. Knight (117)
Level 29 Attack Speed *(cooldown in seconds)
1. Sludge King (1.21)
2. Storm Panda (1.17)
3. Paladin (1.14)
4. Doom Guard (1.13)
5. Tree Goddess (1.13)
6. Shadow Lich (1.13)
7. Satyr Thundercaller (1.12)
8. Void Walker (1.12)
9. Banshee (1.12)
10. Skeletal Mage (1.10)
11. Pit Lord (1.10)
12. Sorceress (1.10)
Level 29 DPS
1. Druid of the Claw (108.66)
2. Necromancer (112.08)
3. Obsidian Statue (112.74)
4. Paladin (113.58)
5. Demolitionist (113.79)
6. Warlock (113.99)
7. Shaman (115.15)
8. War Golem (115.52)
9. Alchemist (115.88)
10. Eredar Diabolist (116.40)
Level 29 HP
1. Tree Goddess (1578)
2. Skeletal Mage (1620)
3. Skinkapulter (1683)
4. Huntress (1704)
5. Elven Hunter (1746)
6. Troll Beserker (1746)
7. Rifleman (1746)
8. Zergling (1746)
9. Gnoll Assassin (1767)
10. Flame Contraption (1767)
11. Harpy Stormwitch (1767)
12. Merchant (1767)
13. Helicopter (1767)
Level 29 Armor
1. Storm Panda (4.3)
2. Skeletal Mage (5.2)
3. Druid of the Talon (5.4)
4. Hematologist (5.7)
5. Sludge King (5.7)
6. Shadow Lich (5.8)
7. Tree Goddess (5.8)
8. Warlock (5.9)
9. Arcane Wizard (5.9)
10. Void Walker (5.9)
11. Satyr Thundercaller (5.9)
Level 29 EHP
1. Skeletal Mage (2125)
2. Tree Goddess (2127)
3. Flame Contraption (2403)
4. Banshee (2432)
5. Void Walker (2449)
6. Tuskarr Mage (2453)
7. Druid of the Talon (2506)
8. Shaman (2507)
9. Holy Priest (2515)
10. Sorceress (2522)
Level 29 Mana
1. Raider (868)
2. Footman (910)
3. Hippogryph (924)
4. Naga Warrior (924)
5. Dryad (938)
6. Gnoll Assassin (952)
7. Ogre Warlord (952)
8. Sludge King (952)
9. Abomination (952)
10. Jungle Stalker (952)
Level 29 Movespeed
1. War Golem (287.2)
2. Centaur Khan (291.0)
3. Pit Lord (294.4)
4. Warlock (295.8)
5. Rifleman (296.4)
6. Makrura (297.4)
7. Grunt (297.8)
8. Paladin (298.2)
9. Kodo Rider (299.8)
10. Alchemist (300.8)
Level 29 Battle Power
1. Tree Goddess (276,484)
2. Shaman (288,662)
3. Shadow Lich (300,087)
4. Ice Troll Priest (304,503)
5. Flame Contraption (305,070)
6. Necromancer (306,056)
7. Holy Priest (308,027)
8. Skeletal Mage (309,777)
9. Sorceress (316,863)
10. Storm Panda (331,420)
v0.88 Changelog
The changes for version 0.88 focused mainly on four existing heroes: Paladin, Jungle Stalker, Chaos Peon, and Spider. Paladin was essentially remade, leaving none of his original abilities intact; in fact, Wave of Light is the only ability that is remotely similar, thus it retains the old name. Jungle Stalker was also revamped, although all four of his abilities have the same function as before, with some slightly different mechanics, including the removal of the annoying knockback on Rampage. Both Paladin and Jungle Stalker were renovated primarily because of the lag they were sometimes causing in multiplayer games.
Chaos Peon had a significant glitch in v0.87, the version it was released in. Its Summon Peon ability was supposed to have a limit of 1 Peon at a time, but players soon found out that it could spawn many more. This was the first thing fixed in v0.88. Spider's Silk Trail was also remade, as the original passive one was highly glitched. It is now an active ability that is somewhat stronger when casted, and allows the Spider easier escape at times because the enemy won't always have a trail of webs to follow.
Additionally, Blood Fiend and Goblin Sapper were each given a new ability that replaced an old one. Blood Fiend originally had Blood Enhancement, which increased hitpoints and attack speed. However, this passive made the Blood Fiend a bit boring to use; it is now replaced with Blood Boil, an active ability that can be casted on an ally or himself, increasing damage and hitpoint regeneration. This complements his other abilities well, especially with lifesteal.
Goblin Sapper's old Suicide ability was simply useless most of the time, and even in the rare case that the player could blow something up, they would die and have to wait to respawn. It is now replaced with Sticky Grenade, which plants an invisible bomb on any target, showing neither an animation nor a debuff. After 5 seconds, the grenade will explode, dealing massive area of effect damage. If the target unit died before the 5 seconds, the explosion would occur then with stronger effect. This can be casted on the Goblin Sapper's own Demolition Bot and Land Mines, causing their explosions to be much more deadly.
Many hero stats were slightly tweaked for minor balancing. Demolitionist had a somewhat large makeover as his primary attribute changed from intelligence to strenth. However, this should not significantly affect his play style. Again, no items were changed.
v0.88 Changelog
Gameplay:
-remade Paladin and Jungle Stalker due to heavy lag from their original abilities
Fixes:
-fixed Summon Peon to be able to summon only 1 Peon at a time
-fixed Ring of Fire to work on a target on a friendly Teleporter
Balancing:
-Blood Fiend
--Blood Boil (replaced Blood Enhancement): new skill
-Death Ranger
--Silence: mana cost - 75 to 100
-Demolitionist
--now a strength hero
--strength: 1.5/level to 1.8/level
--agility: 1.6/level to 1.9/level
--intelligence: 3.4/level to 2.6/level
-Dryad: agility - 20 to 22
-Ghost: agility - 19 to 25
-Goblin Sapper
--Sticky Grenade (replaced Suicide): new skill
-Knight: strength - 2.5/level to 2.0/level, agility: 2.2/level to 2.5/level
-Nerubian Lord: agility - 20 to 24
-Rifleman: agility - 23 to 26
-Skeletal Mage: intelligence - 3.3/level to 3.5/level
-Spider
--Silk Trail is now an active ability; this was also to fix an annoying glitch
-Troll Batrider: agility - 2.7/level to 2.3/level
-Void Walker: intelligence - 3.3/level to 3.6/level
Others:
-fixed several slight tooltip errors, e.g. misspellings, etc.
-improved terrain outpost terrain
Sunday, July 13, 2008
Ya'shil the Harpy Stormwitch
Stats
Affiliation: High Elves
HP: 465
Mana: 238
Primary: Agility
Str: 15 + 1.2
Agi: 22 + 2.8
Int: 17 + 1.8
Range: 550
Speed: 300
Ya'shil starts with a normal amount of hitpoints and mana, high agility, but at 550, her range is slightly shorter than that of most ranged heroes. Her average movespeed can be increased with the Cyclone's speed aura, but with Turbulence, she can easily outmaneuver just about any hero.
 Stratoblast [T]
The Harpy launches a blast of stratospheric wind at an enemy target, dealing damage, knocking the unit back a certain distance, and stunning for 1 second.
Level 1 - 50 dmg, 150 knockback
Level 2 - 100 dmg, 225 knockback
Level 3 - 150 dmg, 300 knockback
Level 4 - 200 dmg, 375 knockback
Level 5 - 250 dmg, 450 knockback
Cooldown: 9
Mana Cost: 100/115/130/145/160
Stratoblast is a highly flexible ability; at most times it can be used like a normal damage/stun spell, but the knockback really gives this ability variety. The most common use of the knockback is a combination with Turbulence; using Turbulence first, the hero becomes invisible and swooshes to behind the enemy hero. This causes the enemy to knocked towards the Harpy's team, usually at a tower or an allied hero. This combo also slows down an enemy retreat dramatically by forcing them to go backwards. Good players often find creative uses for this ability. Because of the increased damage and knockback, many players prefer to max this soon, i.e. immediately after Cyclone.
 Cyclone [E]
Summons a controlled cyclone to assist the Harpy.
Level 1 - 400 hp, 23 to 25 dmg, gains Trueshot Aura
Level 2 - 600 hp, 33 to 35 dmg, gains Wind Turbulation
Level 3 - 800 hp, 43 to 45 dmg, gains Quivering Aura
Level 4 - 1000 hp, 53 to 55 dmg, gains Trueshot Aura (Level 2)
Level 5 - 1200 hp, 63 to 65 dmg, gains Wind Turbulation (Level 2)
Cooldown: 30
Mana Cost: 100/115/130/145/160
The Cyclone is a summoned unit useful for its three important auras. Trueshot Aura adds 10% attack damage to nearby ranged units, including the Harpy and the Cyclone itself. At Cyclone level 4, Trueshot Aura improves to level 2, providing 20% bonus damage.
Wind Turbulation gives a subtle movespeed boost, 5% at level 1 and 10% at level 2, which are gained at levels 2 and 5 of the Cyclone respectively. It may seem insignificant, but 10% movespeed can often make the difference between a succesful chase ending in a kill and a failed one where the enemy escapes with only a remnant of hp.
Quivering Aura is slightly different in that it affects enemies and has only one level, but it does have significant power, reducing nearby enemies' attack damage by 15%. Each aura alone may seem small, but with all three together it can sway any battle, especially larger ones where the auras affect more heroes.
The Cyclone can also be used to capture Observatories in the early game without having to give up experience by leaving the lane with the hero. Combined with its auras, it is no secret that good players will max this ability first.
 Turbulence [R]
Uses the turbulence in the air to become invisible for 5 seconds, increasing movespeed to maximum. Cooldown decreases per level.
Cooldown: 18/16/14/12/10
Mana Cost: 75
Similar to Nerubian Weaver's Shukuchi in DotA, Turbulence is used to travel very quickly and escape difficult situations. It does not deal damage when hitting someone; however, this added stealth helps set up ideal knockback situations in combination with Stratoblast. Its most valuable asset is the speed, allowing the Harpy to quickly traverse SMotA's landscape.
For detailed information about the invisibility mechanic, check out the Invisibility article.
 Cyclonic Storm [C]
The Harpy Stormwitch summons boisterous cyclones into the air for a duration of time, making nearby enemy units invulnerable but unable to attack, move, or cast spells.
Level 1 - 5 seconds, 1000 aoe
Level 2 - 6 seconds, 1500 aoe
Level 3 - 7 seconds, 2000 aoe
Level 4 - 8 seconds, 2500 aoe
Cooldown: 120/100/80/60
Mana Cost: 150/200/250/300
Another flexible spell at the Harpy's disposal, Cyclonic Storm disables and launches all nearby enemies into the sky, although at the same time making them unable to attacked. This is useful in escaping, chasing, and base destroying. If you or an ally is about to die, casting this will normally give more than enough time to escape, and at the same time allowing other allies to zoom in and counter attack. While chasing, this can be used to give you and your allies time to run into the enemy's escape path, also allowing a deliberate positioning of a Stratoblast knockback. The third main use is to delay enemy opposition when capturing or destroying their base, as this ability does not lift buildings into the air! After all the units are hopelessly blown into the air, the Harpy and her allies gain precious time for bringing down the target structure before the swirling enemies come back down.
Saturday, July 12, 2008
Corpulent the Abomination
Stats
Affiliation: Demons
HP: 717
Mana: 168
Primary: Strength
Str: 27 + 3.1
Agi: 16 + 1.6
Int: 12 + 1.3
Range: 128
Speed: 295
The Abomination has an extraordinary amount of starting health, in fact, the highest of all heroes, and also a high strength gain. He can eat units to increase his strength further. It is recommended to buy a mana item for the early game since he does have 3 active abilities to use with not a lot of mana (although the mana costs are not particularly high).
 Consume [C]
Consumes an enemy unit, digesting it slowly at the rate of 50 health per second. If the Abomination is killed while consuming, the consumed unit will be released. If the consumed unit had the Epidemic debuff, the Abomination will heal from consuming. Upon fully consuming a unit, the Abomination will gain 1 strength. Does not work on heroes or creeps above level 6.
Level 1 - 5 hp/sec heal
Level 2 - 10 hp/sec heal
Level 3 - 15 hp/sec heal
Level 4 - 20 hp/sec heal
Level 5 - 25 hp/sec heal
Cooldown: 90/75/60/45/30
Mana Cost: 150/120/90/60/30
Consume is a very appetizing ability, but experienced players will wait until this is at a higher level to use. Firstly it has a high mana cost at lower levels, and the Abomination does not start out with much mana in the first place, and secondly, the cooldown is too long to use on a regular basis. And in the early game, it is more important to stay alive and harass opponents in your lane anyways; Epidemic is often the first choice among Abomination players. However, Consume can be powerful in the late game since the Abomination can easily build up strength.
Infects the target unit with an epidemic, dealing damage over time. If one of the infected unit's allies comes in close contact with it, the ally will also become infected and can in turn infect other allies. Lasts 9 seconds.
Level 1 - 9 damage per second
Level 2 - 18 damage per second
Level 3 - 27 damage per second
Level 4 - 36 damage per second
Level 5 - 45 damage per second
Cooldown: 18
Mana Cost: 75
The skill that the Abomination is known for, Epidemic is a great early game hero harassing ability that still retains power in the late game against large creep waves. This is especially deadly if the opponent does not know how Epidemic works! Beginners have often died to a single cast of a level 1 Epidemic, because they stay right next to an infected unit, and right as the buff would have worn off, they are reinfected due to staying too close. When you are infected, you should run to a less crowded area, preferably to the side of your lane, away from your own creeps. This is how ranged heroes should respond, but melee heroes should just stay back and try not to become infected.
 Putrid Odor [P]
Slows nearby enemies' attack and movement speeds in a 300 aoe. Also causes already-infected units in this range to become reinfected with Epidemic.
Level 1 - 5% slow
Level 2 - 10% slow
Level 3 - 15% slow
Level 4 - 20% slow
Level 5 - 25% slow
Putrid Odor is similar to the Firelord's Exhaustion ability, although with a smaller area and a more dramatic slow. This skill is also useful for its Epidemic reinfecting effect, allowing the Abomination to keep his opponents infected by walking near them. Unfortunately this cannot be used to infect normal, healthy units, but the slow effect does help the Abomination chase. Expert players tend to max Epidemic first.
 Regurgitate [R]
The Abomination launches a heap of flesh at a target unit, causing damage to himself and to his opponent. This launch stuns the target for a short time and also infects or reinfects it with Epidemic.
Level 1 - 300 to self and target, 2 sec stun
Level 2 - 450 to self and target, 2.5 sec stun
Level 3 - 600 to self and target, 3 sec stun
Level 4 - 750 to self and target, 3.5 sec stun
Cooldown: 120
Mana Cost: 100/150/200/250
A recent addition, this ability essentially damages the Abomination by ejecting a piece of rotting flesh from it, which then hits a target unit, damaging and stunning it. In order to not suffer so much from the self inflicted damage, it is recommended that the player buy extra health items or use Epidemic on a nearby creep and promptly Consume it, as eating it will heal the Abomination. This can be used as both a chasing and finishing move, because even if it leaves the target with a few health, the Epidemic effect will soon destroy it. This is yet another reason to max Epidemic first.
v0.87 Hero Statistics
Ranks in these lists do not factor in items or abilities; however, stat bonuses are included at level 29 statistics. In case of tie, heroes in the tie will be ranked in no particular order. Thanks to KavuChameleon for providing the spreadsheet!
Top Tens
Strength per Level
1. Sludge King (+4.0)
2. Doom Guard (+3.3)
3. Ogre Warlord (+3.2)
4. Pit Lord (+3.2)
5. Abomination (+3.1)
6. Bandit (+3.0)
7. Jungle Stalker (+3.0)
8. Grunt (+2.9)
9. Mountain Giant (+2.9)
10. Death Knight (+2.6)
Agility per Level
1. Warden (+3.2)
2. Spell Breaker (+2.9)
3. Naga Warrior (+2.9)
4. Gnoll Assassin (+2.9)
5. Gargoyle (+2.8)
6. Raider (+2.8)
7. Zergling (+2.8)
8. Harpy Stormwitch (+2.8)
9. Dark Ranger (+2.7)
10. Troll Batrider (+2.7)
11. Helicopter (+2.7)
Intelligence per Level
1. Demolitionist (+3.4)
2. Skeletal Mage (+3.3)
3. Void Walker (+3.3)
4. Archmage (+3.3)
5. Banshee (+3.2)
6. Faerie Dragon (+3.2)
7. Druid of the Talon (+3.2)
8. Storm Panda (+3.0)
9. Tree Goddess (+3.0)
10. Tuskarr Mage (+2.9)
11. Satyr Thundercaller (+2.9)
12. Medicine Man (+2.9)
Total Stats per Level
1. Faerie Dragon (+6.7)
2. Archmage (+6.6)
3. Spell Breaker (+6.5)
4. Demolitionist (+6.5)
5. Doom Guard (+6.4)
6. Far Seer (+6.3)
7. Warden (+6.3)
8. Druid of the Talon (+6.3)
9. Chaos Peon (+6.3)
10. Void Walker (+6.2)
Level 29 Damage *(not including dice)
1. Sludge King (178)
2. Void Walker (161)
3. Archmage (156)
4. Skeletal Mage (155)
5. Faerie Dragon (155)
6. Ogre Warlord (154)
7. Doom Guard (154)
8. Banshee (154)
9. Pit Lord (153)
10. Druid of the Talon (153)
11. Abomination (153)
Level 29 Attack Speed *(cooldown in seconds)
1. Warden (0.74)
2. Naga Warrior (0.75)
3. Zergling (0.76)
4. Gnoll Assassin (0.76)
5. Gargoyle (0.77)
6. Spell Breaker (0.77)
7. Harpy Stormwitch (0.77)
8. Raider (0.77)
9. Troll Batrider (0.77)
10. Dark Ranger (0.78)
11. Helicopter (0.78)
12. Mutation (0.78)
Level 29 DPS *(Damage per second)
1. Warden (205.18)
2. Naga Warrior (194.09)
3. Zergling (189.74)
4. Spell Breaker (185.44)
5. Raider (181.18)
6. Mutation (176.96)
7. Gnoll Assassin (174.46)
8. Gargoyle (172.38)
9. Troll Batrider (168.24)
10. Harpy Stormwitch (168.24)
Level 29 HP
1. Sludge King (3468)
2. Ogre Warlord (2964)
3. Doom Guard (2964)
4. Pit Lord (2943)
5. Abomination (2943)
6. Jungle Stalker (2769)
7. Bandit (2775)
8. Mountain Giant (2754)
9. Grunt (2733)
10. Death Knight (2565)
Level 29 Armor
1. Warden (14.1)
2. Naga Warrior (13.6)
3. Zergling (13.4)
4. Spell Breaker (13.2)
5. Raider (13.0)
6. Mutation (12.8)
7. Knight (12.1)
8. Hippogryph (12.0)
9. Earth Revenant (12.0)
10. Desert Advocate (12.0)
11. Blood Fiend (12.0)
Level 29 EHP (Effective Hit Points, includes armor)
1. Ogre Warlord (4725)
2. Abomination (4709)
3. Sludge King (4654)
4. Jungle Stalker (4574)
5. Pit Lord (4568)
6. Doom Guard (4529)
7. Grunt (4520)
8. Mountain Giant (4473)
9. Bandit (4424)
10. Knight (4282)
Level 29 Mana
1. Void Walker (1974)
2. Archmage (1904)
3. Faerie Dragon (1890)
4. Skeletal Mage (1890)
5. Banshee (1876)
6. Druid of the Talon (1862)
7. Demolitionist (1820)
8. Storm Panda (1806)
9. Tree Goddess (1778)
10. Satyr Thundercaller (1750)
11. Medicine Man (1750)
Level 29 Battle Power (DPS times EHP)
1. Raider (718,839)
2. Warden (693,143)
3. Ogre Warlord (685,467)
4. Spell Breaker (684,870)
5. Sludge King (684,538)
6. Abomination (682,528)
7. Naga Warrior (667,235)
8. Mutation (664,544)
9. Jungle Stalker (653,782)
10. Grunt (643,012)
Bottom Tens
Strength per Level
1. Tree Goddess (+1.2)
2. Skeletal Mage (+1.3)
3. Skinkapulter (+1.4)
4. Rifleman (+1.4)
5. Gnoll Assassin (+1.4)
6. Huntress (+1.4)
7. Zergling (+1.5)
8. Harpy Stormwitch (+1.5)
9. Helicopter (+1.5)
10. Merchant (+1.5)
11. Tuskarr Mage (+1.5)
12. Troll Beserker (+1.5)
13. Warden (+1.5)
14. Elven Hunter (+1.5)
15. Demolitionist (+1.5)
16. Flame Contraption (+1.5)
17. Banshee (+1.5)
Agility per Level
1. Sludge King (+1.0)
2. Storm Panda (+1.0)
3. Banshee (+1.3)
4. Satyr Thundercaller (+1.3)
5. Skeletal Mage (+1.3)
6. Void Walker (+1.3)
7. Shadow Lich (+1.3)
8. Doom Guard (+1.3)
9. Tree Goddess (+1.3)
10. Paladin (+1.3)
11. Pit Lord (+1.3)
Intelligence per Level
1. Sludge King (+1.0)
2. Raider (+1.1)
3. Dryad (+1.2)
4. Grunt (+1.2)
5. Footman (+1.2)
6. Hippogryph (+1.2)
7. Gnoll Assassin (+1.2)
8. Naga Warrior (+1.2)
9. Ogre Warlord (+1.2)
10. Troll Beserker (+1.3)
11. Abomination (+1.3)
12. Rifleman (+1.3)
13. Jungle Stalker (+1.3)
14. Blood Fiend (+1.3)
Total Stats per Level
1. Rifleman (+4.9)
2. Hippogryph (+5.2)
3. Troll Beserker (+5.3)
4. Master of the Hunt (+5.3)
5. Nerubian Lord (+5.5)
6. War Golem (+5.5)
7. Necromancer (+5.5)
8. Shaman (+5.5)
9. Druid of the Claw (+5.5)
10. Gnoll Assassin (+5.5)
11. Shaman (+5.5)
12. Dryad (+5.5)
Level 29 Damage *(not including dice)
1. Ghost (105)
2. Merchant (107)
3. Nether Dragon (109)
4. Druid of the Claw (111)
5. Meat Wagon (111)
6. Rifleman (114)
7. Crypt Lurker (114)
8. Eredar Diabolist (114)
9. Nerubian Lord (114)
10. Shaman (117)
Level 29 Attack Speed *(cooldown in seconds)
1. Sludge King (1.21)
2. Storm Panda (1.17)
3. Paladin (1.14)
4. Doom Guard (1.13)
5. Tree Goddess (1.13)
6. Shadow Lich (1.13)
7. Satyr Thundercaller (1.12)
8. Void Walker (1.12)
9. Banshee (1.12)
10. Skeletal Mage (1.10)
11. Pit Lord (1.10)
12. Sorceress (1.10)
Level 29 DPS
1. Druid of the Claw (108.66)
2. Necromancer (112.08)
3. Obsidian Statue (112.74)
4. Paladin (113.58)
5. Warlock (113.99)
6. Shaman (115.15)
7. War Golem (115.52)
8. Alchemist (115.88)
9. Eredar Diabolist (116.40)
10. Spirit Walker (116.54)
11. Polar Furbolg Shaman (116.54)
Level 29 HP
1. Tree Goddess (1578)
2. Skeletal Mage (1620)
3. Skinkapulter (1683)
4. Huntress (1704)
5. Elven Hunter (1746)
6. Troll Beserker (1746)
7. Rifleman (1746)
8. Zergling (1746)
9. Gnoll Assassin (1767)
10. Flame Contraption (1767)
11. Harpy Stormwitch (1767)
12. Merchant (1767)
13. Helicopter (1767)
Level 29 Armor
1. Storm Panda (4.3)
2. Skeletal Mage (5.2)
3. Druid of the Talon (5.4)
4. Hematologist (5.7)
5. Sludge King (5.7)
6. Shadow Lich (5.8)
7. Tree Goddess (5.8)
8. Warlock (5.9)
9. Arcane Wizard (5.9)
10. Demolitionist (5.9)
11. Void Walker (5.9)
12. Satyr Thundercaller (5.9)
Level 29 EHP
1. Skeletal Mage (2125)
2. Tree Goddess (2127)
3. Flame Contraption (2403)
4. Banshee (2432)
5. Void Walker (2449)
6. Tuskarr Mage (2453)
7. Druid of the Talon (2506)
8. Shaman (2507)
9. Holy Priest (2515)
10. Sorceress (2522)
Level 29 Mana
1. Raider (868)
2. Footman (910)
3. Hippogryph (924)
4. Naga Warrior (924)
5. Dryad (938)
6. Gnoll Assassin (952)
7. Ogre Warlord (952)
8. Sludge King (952)
9. Abomination (952)
10. Jungle Stalker (952)
Level 29 Battle Power
1. Tree Goddess (276,484)
2. Shaman (288,662)
3. Skeletal Mage (298,233)
4. Shadow Lich (300,087)
5. Ice Troll Priest (304,503)
6. Flame Contraption (305,070)
7. Necromancer (306,056)
8. Holy Priest (308,027)
9. Sorceress (316,863)
10. Storm Panda (331,420)
Attributes
Strength, agility, and intelligence are some of the most common terms to exist in the Warcraft III vocabulary. What effects does each one have in SMotA?
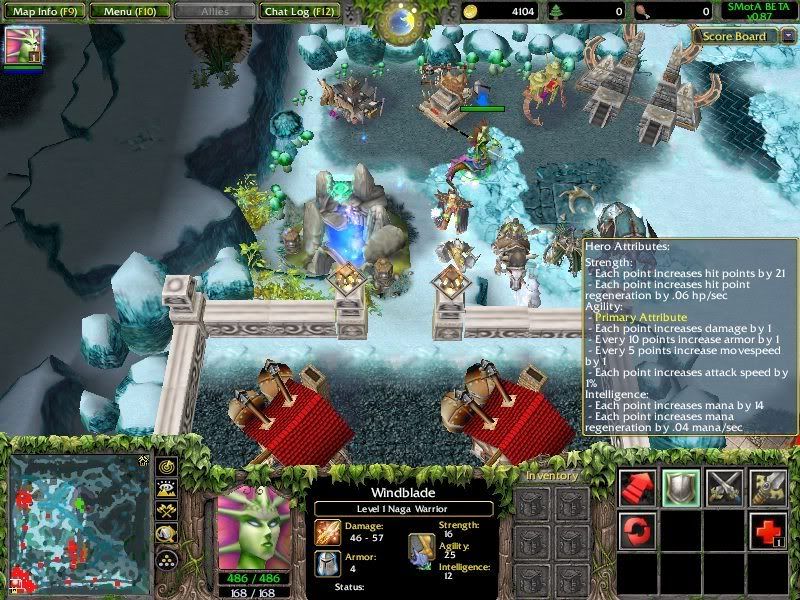
(Clicking on this picture will automatically zoom in on it.)
Strength
Each point of strength adds 21 hp, 0.06 hitpoint per second regeneration, and also 1 damage if strength is your primary attribute. In SMotA, strength is useful more for the hitpoints and not the regeneration. That said, 100 strength will provide a sturdy 6 hp/sec regeneration, but isn't the 2100 hp a bit more prominent?
If you need some hp, buy some strength items; a Maul of Strength provides 10 strength, while the Horn gives 25. Also, Essence of Aszune/Heart of Searinox/Soul Core provide not only strength but bonus hp, hp regen, and give a healing ability. However, these are much more costly and should be reserved for strength heroes.
Agility
Each point of agility adds 1% attack speed, 0.1 armor, 0.2 movespeed, and of course 1 damage if agility is your primary attribute. The attack speed and armor are typical of most AoS maps, but the 0.2 movespeed is powerful as well. This will cause every 5 agility to add 1 movespeed, which doesn't seem a lot at first, but this adds up quickly; 100 agility will add 20 movespeed, not to mention the 100% attack speed and 10 armor. Having high agility also allows many heroes to go from near max speed to the max speed of 522, at least temporarily with the help of speed boosting abilities.
Item-wise, Bloodfeather's Heart and Key of Agility, which provide 10 and 25 agility respectively, are good for building agility. Also, the Curve Bow/Windbow series, although costly, can add much agility and other effects.
Intelligence
Each point of intelligence adds 14 mana and 0.04 mana per second regeneration, also 1 damage if intelligence is your primary attribute. A must in the early game, this attribute actually becomes less significant as the game draws on because most heroes will have sufficient mana pools to cast their spells over and over again.
However, the intelligence heroes often have highly mana intensive ultimates, and if they also use certain items like the Thunderlizard Diamond, they must be prepared to invest more into intelligence. For example, even with a maxed out Attribute Bonus, a level 29 Warlock has 1414 mana total, yet his ultimate alone costs 850. Enemies can use the Sphere of Ignorance orb to counteract this, and the Warlock must get additional mana. The Ring of the Archmagi/Mindstaff/Gloves of Magic are perfect items for this; the Gloves of Magic adds 1260 mana total, as well as many other powerful bonuses. For a cheaper remedy, the Ring of the Mind and the Scepter of Intelligence add 10 and 25 intelligence respectively.
Friday, July 11, 2008
Observatories
In SMotA players can capture Observatories that grant enormous scouting advantages. Many beginners do not know what they are, and even intermediate players do not know when to take, or not to take an Observatory. First let us look at some facts regarding them:
Number of Observatories: 2
Observatories per team at the start: 1
Hitpoints: 500
Armor: 0, Fortified
Sight radius: 5000 4000
Truesight radius: 1000
Gold given when captured: 150
HP after capturing: 250 (or 50%)
HP regeneration: 2 per second
Ok, 5000 sight range sounds like a lot. But exactly how much? (In the current version the range is 4000; the pictures below are invalid.)
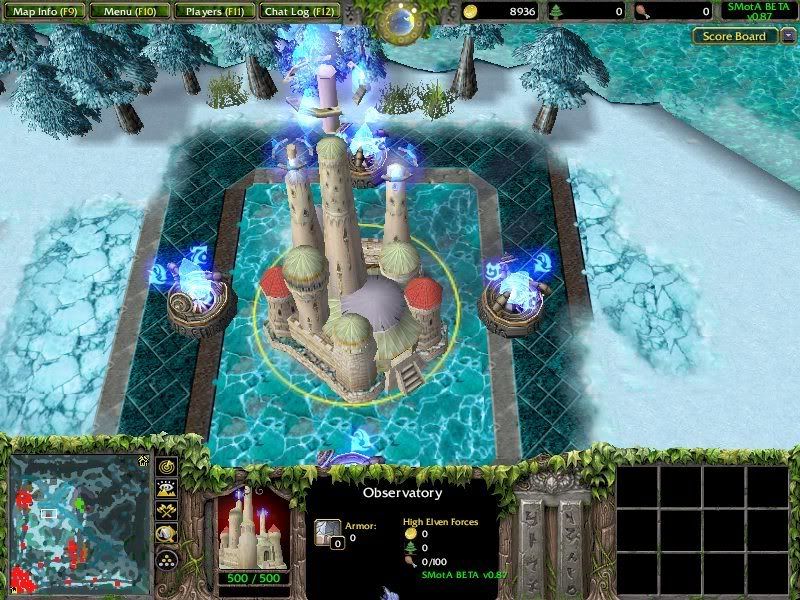
Note carefully that in the minimap, you can see a large circle of vision where everything around it is dim. That is the sight given by the Observatory!
SMotA has a simple method of capturing Observatories (and Outposts as well, but we will get to that in another section). Simply reduce its hitpoints to zero, and it will switch its allegiance! However, it is possible to deny them; when you land the final blow on your team's Observatory, it will remain under your team's control.
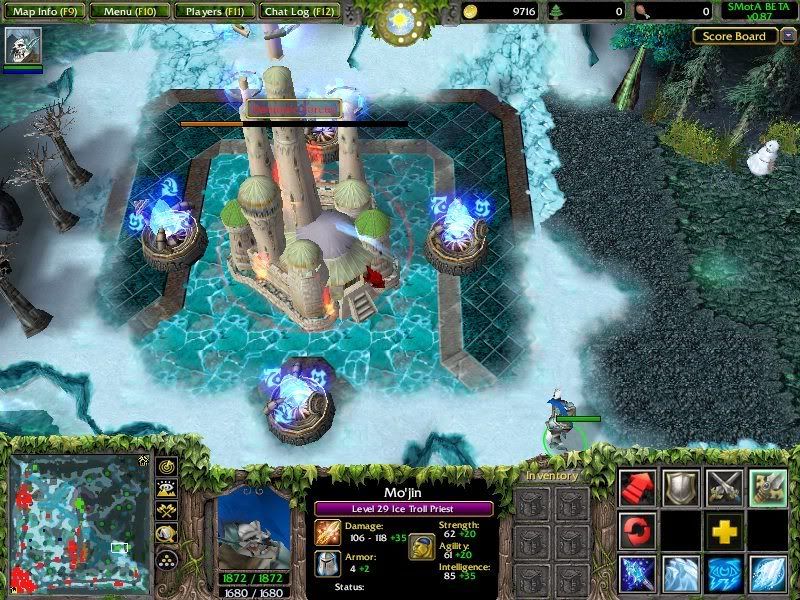
After capturing an Observatory, it will be reset to half-hp and begin self-repairing from there. This is to make captures in the early game not take so long; at the same time, some heroes with certain abilities will be able to take out a freshly captured Observatory in one hit, making them very difficult to defend.
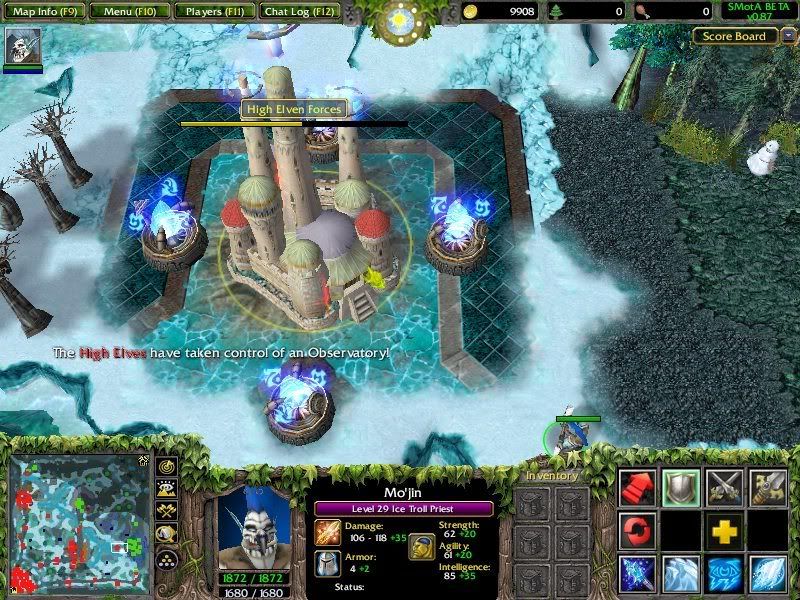
Tips
The point of Observatories is to give the controlling team much enhanced sight, and also to give the map even more of a "territorial" feel, especially combined with the Outposts. The team controlling the nearby Observatory can easily set up ganks, and just as easily avoid them. They can also serve as a fighting ground against invisibility heroes, since Observatories do have a 1000 aoe Truesight. However, many of these invisibility heroes can simply capture the Observatory themselves and use it against you!
Observatory Rush
A common strategy by advanced players is the Observatory Rush. As the name suggests, the player will pick a hero, buy some starting items, then immediately use one of the Teleporters and head for the enemy Observatory with the idea of capturing it before the first creep wave. Heroes with a summon at level one, e.g. Skink, Druid of the Talon, etc., can use their summon to help bring down the Observatory's hitpoints. If the opponent's team is caught off-guard with all of their heroes still in the base, then the Observatory can usually be taken.
However, in the case where a hero or two are sent to defend, a battle can occur as early as level one, usually to the victory of the defenders. But sometimes the offense sends in two, three, or even five heroes to get the Observatory, then scramble to their lanes. The defensive side normally has to concede the Observatory for at least the first five minutes of the game, because if a hero goes to recapture it, they will be losing out on precious experience in the lane (newbies often fall for this trick). This early attack guarantees a sight advantage and also a slight monetary one, since the player who last-hit the Observatory will have 150 extra gold!
In fact, if the attack occurs extremely early, and the other team does not defend, one hero can go in, capture the Observatory, run back to a Teleporter, buy an item with the extra gold, then teleport back in the lane just in time for the first creep wave to meet. However the player has to be really quick and know where the Teleporters are in order to pull this off.
Summoned Units
A number of heroes can summon attacking units, normally to assist in combat. However, most summons are also great for capturing Observatories, especially in the early game, since the hero can stay in the lane farming experience, while the summoned unit engages in a one-sided battle against an Observatory. The downside is that because summons are generally much weaker than heroes, a defending hero can normally defend the Observatory from capture. But that also means you can have more experience from farming in your lane. In the late game, summons can be put to better use since the hero should be able to run quickly with Boots to the Observatory, take it down in a few hits, then run back to the lane with 150 extra gold.
Observatory vs. Outpost
Often in the heat of the middle and late game, players have to make short term decisions on whether to capture a certain Outpost or an Observatory. My suggestion is if you can, take both. And if you can't, it is often a choice in which the correct action depends on the situation. Observatories have less hitpoints and are undefended, but are further from Teleporter exits. So if you think there are nearby enemies, go for the Observatory, since immediately after capturing it you will be able to see anyone nearby. Taking an Outpost has a larger impact on the game, but if a hero shows up and forces a fight in front of his Outpost tower, then you are at a disadvantage.
Neutrals
Both Observatories are within walking distance of neutral creep camps, which provide excellent farming opportunities. The bad news is that while farming, your outpost may be captured and the enemy will know exactly where you are. However, the good news is that you will be able to see him coming from a mile away before he even gets near the Observatory.
Number of Observatories: 2
Observatories per team at the start: 1
Hitpoints: 500
Armor: 0, Fortified
Sight radius: 5000 4000
Truesight radius: 1000
Gold given when captured: 150
HP after capturing: 250 (or 50%)
HP regeneration: 2 per second
Ok, 5000 sight range sounds like a lot. But exactly how much? (In the current version the range is 4000; the pictures below are invalid.)
Note carefully that in the minimap, you can see a large circle of vision where everything around it is dim. That is the sight given by the Observatory!
SMotA has a simple method of capturing Observatories (and Outposts as well, but we will get to that in another section). Simply reduce its hitpoints to zero, and it will switch its allegiance! However, it is possible to deny them; when you land the final blow on your team's Observatory, it will remain under your team's control.
After capturing an Observatory, it will be reset to half-hp and begin self-repairing from there. This is to make captures in the early game not take so long; at the same time, some heroes with certain abilities will be able to take out a freshly captured Observatory in one hit, making them very difficult to defend.
Tips
The point of Observatories is to give the controlling team much enhanced sight, and also to give the map even more of a "territorial" feel, especially combined with the Outposts. The team controlling the nearby Observatory can easily set up ganks, and just as easily avoid them. They can also serve as a fighting ground against invisibility heroes, since Observatories do have a 1000 aoe Truesight. However, many of these invisibility heroes can simply capture the Observatory themselves and use it against you!
Observatory Rush
A common strategy by advanced players is the Observatory Rush. As the name suggests, the player will pick a hero, buy some starting items, then immediately use one of the Teleporters and head for the enemy Observatory with the idea of capturing it before the first creep wave. Heroes with a summon at level one, e.g. Skink, Druid of the Talon, etc., can use their summon to help bring down the Observatory's hitpoints. If the opponent's team is caught off-guard with all of their heroes still in the base, then the Observatory can usually be taken.
However, in the case where a hero or two are sent to defend, a battle can occur as early as level one, usually to the victory of the defenders. But sometimes the offense sends in two, three, or even five heroes to get the Observatory, then scramble to their lanes. The defensive side normally has to concede the Observatory for at least the first five minutes of the game, because if a hero goes to recapture it, they will be losing out on precious experience in the lane (newbies often fall for this trick). This early attack guarantees a sight advantage and also a slight monetary one, since the player who last-hit the Observatory will have 150 extra gold!
In fact, if the attack occurs extremely early, and the other team does not defend, one hero can go in, capture the Observatory, run back to a Teleporter, buy an item with the extra gold, then teleport back in the lane just in time for the first creep wave to meet. However the player has to be really quick and know where the Teleporters are in order to pull this off.
Summoned Units
A number of heroes can summon attacking units, normally to assist in combat. However, most summons are also great for capturing Observatories, especially in the early game, since the hero can stay in the lane farming experience, while the summoned unit engages in a one-sided battle against an Observatory. The downside is that because summons are generally much weaker than heroes, a defending hero can normally defend the Observatory from capture. But that also means you can have more experience from farming in your lane. In the late game, summons can be put to better use since the hero should be able to run quickly with Boots to the Observatory, take it down in a few hits, then run back to the lane with 150 extra gold.
Observatory vs. Outpost
Often in the heat of the middle and late game, players have to make short term decisions on whether to capture a certain Outpost or an Observatory. My suggestion is if you can, take both. And if you can't, it is often a choice in which the correct action depends on the situation. Observatories have less hitpoints and are undefended, but are further from Teleporter exits. So if you think there are nearby enemies, go for the Observatory, since immediately after capturing it you will be able to see anyone nearby. Taking an Outpost has a larger impact on the game, but if a hero shows up and forces a fight in front of his Outpost tower, then you are at a disadvantage.
Neutrals
Both Observatories are within walking distance of neutral creep camps, which provide excellent farming opportunities. The bad news is that while farming, your outpost may be captured and the enemy will know exactly where you are. However, the good news is that you will be able to see him coming from a mile away before he even gets near the Observatory.
Blaze the Firelord
Stats
Affiliation: Demons
HP: 507
Mana: 308
Primary: Intelligence
Str: 17 + 1.8
Agi: 16 + 1.8
Int: 22 + 2.4
Range: 500
Speed: 290
Blaze begins with a high amount of mana, allowing him to use the first two abilities at least a few times. With a high intelligence growth, he can keep his enemies burning constantly. Well, the passive does that too. Blaze has slightly less range than a typical ranged hero, but this actually helps him get into range for his passive and other spells. With a somewhat low speed, Blaze needs to take out his opponents quickly, or have Boots and give chase, keeping within range for the passive.
Calls down a meteor, dealing damage and stunning units in an area. (325 aoe)
Level 1 - 100 dmg, 1 second stun
Level 2 - 150 dmg, 1.25 second stun
Level 3 - 200 dmg, 1.5 second stun
Level 4 - 250 dmg, 1.75 second stun
Level 5 - 300 dmg, 2 second stun
Cooldown: 15
Mana Cost: 100/115/130/145/160
A signature spell, this is a must for all Firelord players. Many strong players prefer maxing out this ability first, followed by Incinerate. At level five, the 300 aoe damage combined with the 2 second stun make Blaze an incredibly powerful stunner and chaser. Although the enemy has a little over half a second to respond once they see the meteor, it is usually not enough time, as the area of devastation is great. Exhaustion also makes it easier for this ability to hit by slowing down opponents.
Blaze forces flames to erupt from the ground in front of him to burn his enemies to ashes. Deals 15% damage to buildings. Lasts 5 seconds.
Level 1 - 20 damage/second
Level 2 - 40 damage/second
Level 3 - 60 damage/second
Level 4 - 80 damage/second
Level 5 - 100 damage/second
Cooldown: 12
Mana Cost: 120
A strong secondary spell, Incinerate basically causes a line of Flame Strikes to occur going into the direction he targets. A good idea is to run near an enemy hero, cast this in the direction of his retreat, then cast Meteor on top of him. Most likely he will try to run back, but your Meteor will hit, stunning and keeping him in the fires of Incinerate for more precious time. If combined with the ultimate, it can be sometimes possible to force the opponent to suffer the entire 500 damage from this ability.
Blaze’s body is ever burning, thus he uses up much air near him. This mass air use causes nearby units in an aoe to become exhausted due to lack of air. When Blaze dies he will gather up extra air to cause himself to explode for damage in a 700 area.
Level 1 - 3% slow in a 200 aoe, 100 dmg explosion
Level 2 - 6% slow in a 300 aoe, 200 dmg explosion
Level 3 - 9% slow in a 400 aoe, 300 dmg explosion
Level 4 - 12% slow in a 500 aoe, 400 dmg explosion
Level 5 - 15% slow in a 600 aoe, 500 dmg explosion
Exhaustion is a very powerful passive for the Firelord, and although it does not bolster his other spells directly, the 15% slow can keep enemies in the Incineration field or under the Meteor shower for a slightly longer amount of time; a "lucky" Meteor hit may have been impossible without this. The slow is also great in team battles, since it covers a fairly wide area. The explosion damage upon death is a minor addition, but it can kill, and makes him again a great addition in team brawls.
Calls down multiple meteors, dealing damage and stunning units that the meteors hit for .25 seconds, at the rate of 2 meteors per second.
Level 1 - 4 Meteors, 150 dmg each
Level 2 - 5 Meteors, 225 dmg each
Level 3 - 6 Meteors, 300 dmg each
Level 4 - 7 Meteors, 375 dmg each
Channeling
Cooldown: 140/120/100/80
Mana Cost: 200/300/400/500
Meteor Shower is a truly frightening ultimate ability. When casted, several Meteors fall in quick succession, in somewhat random locations in the targetted area. Of course not every Meteor will hit every location; in fact, in many times even at max level, only one or two out of seven will hit the intended target. But two is still 750 damage! To try to land as many Meteors on your target as possible, stun him first with the single Meteor, then cast this exactly over the enemy's head.
Unfortunately, this can be countered by stunning the Firelord, canceling the spell, or by simply running out of the Meteor Shower. Heroes with slides and jumps are extremely adept at this, e.g. Pit Lord, Raider, etc. For the Firelord, it is often helpful to have an allied disabling hero nearby, such as Dragonhawk Rider, to stop certain heroes from escaping their fiery doom. And they may throw in their own spells into the mix as well.
Invisibility
Invisibility plays an important role for many heroes in SMotA. It is used typically to hide, scout, or launch sneak attacks. After becoming invisible, a unit will stay that way until it 1) attacks, 2) casts an ability, or 3) expires the duration. The only exception to (1) and (2) is the Mutation hero, whose ultimate allows it to temporarily be able to attack and stay invisible. The Ghost is able to bypass (3) and remain indefinitely cloaked, that is, until it carries out (1) or (2).
Invisibility Options
Several heroes in SMotA have the ability to use the Invisibility mechanic. Note that nearly all are agility heroes.
 Lurker: Burrow (innate) - Goes underground, becoming invisible when not attacking, and also gives enhanced hp regeneration and attack ability
 Desert Advocate: Sand Slide - Slides to a target point, dealing damage along the way, then becomes invisible
 Elven Ranger: Natural Concealment (ultimate) - Gives a passive invisibility that breaks upon attacking or casting an ability
 Ghost: Cloaking Field - Becomes invisible indefinitely until an attack is made or a spell is cast
 Gnoll Assassin: Camouflage - Becomes invisible, slowing down movespeed, but dealing a high amount of bonus damage on the next attack
 Harpy Stormwitch: Turbulence - For a short amount of time becomes invisible and gains maximum movespeed
 Hydra Hatchling: Play Dead - Becomes invisible, gaining movespeed and leaving behind an illusion of a dying Hydra
 Mutation: Invisibility - Becomes invisible, moving slightly faster and dealing bonus damage on the next attack; Spontaneous Mutation - Activateable buff, has a chance upon being attacked to turn invisible and damage and slow nearby enemies; Kyriaki (ultimate) - For a short amount of time, becomes truly invisible, as not even attacks or abilities will reveal himself
 Nerubian Lord: Wind Walk - Becomes invisible, moving faster and dealing bonus damage on the next attack
Invisibility Detection
Some general guidelines for playing against invisibility heroes:
 Towers: All attacking towers in SMotA have the Truesight ability, allowing them to see invisible units near their radius. If you think or know an invisible hero is nearby, retreat to a nearby tower.
 Sentry Wards: Considering the vast size of the map, one Sentry Ward alone cannot cover a sufficient area. Consider buying several and setting them up in critical locations such as ramps, teleport spots, etc. Sentry Wards themselves are invisible.
 Crystal Ball: A typically underused item in "pub" games, the Crystal Ball is a powerful asset when it comes to fighting invisibility heroes. For zero mana cost, a fairly wide area can be revealed, anywhere on the map!
 Radiant Shard: The preferred method by experts of dealing with invisibility heroes, the Radiant Shard orb causes attacks to land a short lasting Faerie Fire debuff on the enemy, both revealing them and lowering their armor! Since nearly all invisibility heroes are agility, they will probably have low hitpoints but high armor. The Radiant Shard, by reducing their armor, allows the user to exploit the low hitpoints of the agility heroes. Of course this will only work once the enemy has revealed himself first, but with proper use, this orb can prevent them from effectively going invisible again. Plus, stacking this orb will not only increase the amount of armor reduction, but also increase the duration.
Hero Counters
Normally one hero shouldn't be a direct counter to another and render it useless, but in this case these invisibility counters are still "soft counters," i.e. it is still questionable whether one of the heroes below could defeat an invisibility hero played in the hands of an expert.
 Far Seer: Omniscience (ultimate) - What could counter invisibility more than revealing everything on the entire map at the press of a hotkey? Well, Far Seer's weak but long-ranged spells do not exactly spell disaster for an invisibility hero, but his combo can easily finish off a hero on low health who has just vanished to escape. This ability also has a long cooldown, and good players on the other team will wait for this duration to expire and then strike again.
 Helicopter: Lift Off - Gives the Helicopter increased movement speed and Truesight temporarily, as well as making him invisible on the "radar" or minimap. This is very dangerous for an invisibility hero as they might not even notice the Helicopter coming until it is too late. Plus, the invisibility hero tends to be alone, and the Helicopter's Auto Gunships are a perfect match for that.
 Huntress: Sentinel - Creates a scout owl to reside on the target tree. This can be painful in the long-term for invisibility heroes because the sentinels last forever, that is, until their tree is destroyed. Unfortunately, most invisibility heroes do not have spells that can destroy trees, but they can normally deal with Huntress just fine, as she does not have any escape spells.
 Shaman: Mass Purge (ultimate) - A double ouch for invisibility heroes, but not as bad as on clearly visible targets. On normal targets, this deals damage equal to 5x the Shaman's intelligence, which can become pretty high, as well as causing a purge effect, rendering them nearly immobile for a short time. Fortunately, invisibility heroes will "dodge" the purge effect but not the damage, or the reveal! Once the target is revealed, the Shaman may be able to finish off the target with other spells or attacks, so it is best to try to kill the Shaman as quickly as possible to avoid future risk. However, this is easier said than done.
 Troll Batrider: Echo Location - Gives increased movespeed and reveals current aoe. Troll Batrider is a true nuissance to invisibility heroes, but can be countered nonetheless. Although Echo Location has the shortest cooldown of all the revealing abilities, it also has the shortest duration, allowing the invisible one to run out of the aoe for the duration and then sneak back in. Interestingly, Echo Location's reveal does not actually follow the Troll Batrider, but this does make him hard to follow.
Invisibility Options
Several heroes in SMotA have the ability to use the Invisibility mechanic. Note that nearly all are agility heroes.
Ghost: Cloaking Field - Becomes invisible indefinitely until an attack is made or a spell is castGnoll Assassin: Camouflage - Becomes invisible, slowing down movespeed, but dealing a high amount of bonus damage on the next attack Hydra Hatchling: Play Dead - Becomes invisible, gaining movespeed and leaving behind an illusion of a dying HydraNerubian Lord: Wind Walk - Becomes invisible, moving faster and dealing bonus damage on the next attack
Invisibility Detection
Some general guidelines for playing against invisibility heroes:
Towers: All attacking towers in SMotA have the Truesight ability, allowing them to see invisible units near their radius. If you think or know an invisible hero is nearby, retreat to a nearby tower.Sentry Wards: Considering the vast size of the map, one Sentry Ward alone cannot cover a sufficient area. Consider buying several and setting them up in critical locations such as ramps, teleport spots, etc. Sentry Wards themselves are invisible.Hero Counters
Normally one hero shouldn't be a direct counter to another and render it useless, but in this case these invisibility counters are still "soft counters," i.e. it is still questionable whether one of the heroes below could defeat an invisibility hero played in the hands of an expert.
Subscribe to:
Posts (Atom)